

 Just like other online advertising channels, freshness is critical to the success of Facebook advertising campaigns. If you only have one set of copy and one ad image, your campaign is sure to run out of steam quickly.
One way to keep your campaigns fresh is to edit ad copy and images frequently. Another way is to use the Facebook Carousel feature, which allows you to display multiple graphics & copy within one ad. Not only is it a great way to keep your ads fresh and varied, it's also a great way to test what's working and what isn't.
So, what are you waiting for? Here's a step-by-step guide for creating, customizing and editing a Facebook Carousel Ad:
1. Open Facebook Ads Manager and navigate to the top right of the page to click the “Create Ad” button.

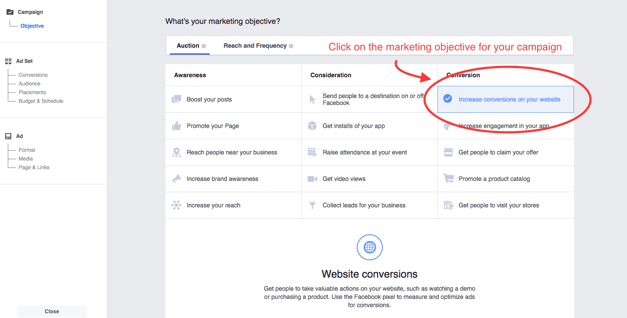
2. Choose a marketing objective. Base this decision on what you want to happen with the campaign. Do you want people to buy something? Do you want them to simply visit your website? Do you just want brand awareness and exposure? Choose the option that best aligns with that objective.
Note: Not all choices will provide the option to create a carousel ad, so just keep that in mind. If you choose an objective and you do not see the carousel option when you get to “Ad Format” then you may need to choose a different objective to start.
Below, you can see we’ve selected “Increase conversions on your website” under the “Conversion” column.
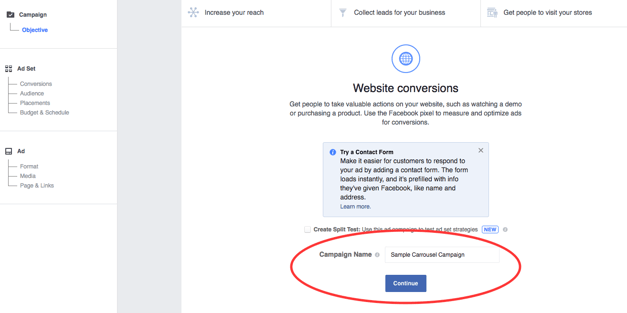
3. Name your campaign. This is the time to give your overall campaign a name. The name will depend on how you organize your campaigns, so it will be a little different for everyone. An easy approach is to name it by the marketing objective and/or any other broad details that will make it unique from other campaigns.
Just remember: You will have an Ad Set (which gets a name and provides deeper organization/segmentation) and the option to create multiple Ads (the format, media used, etc.), both of which will also be getting names.
So, name your ad and click continue.
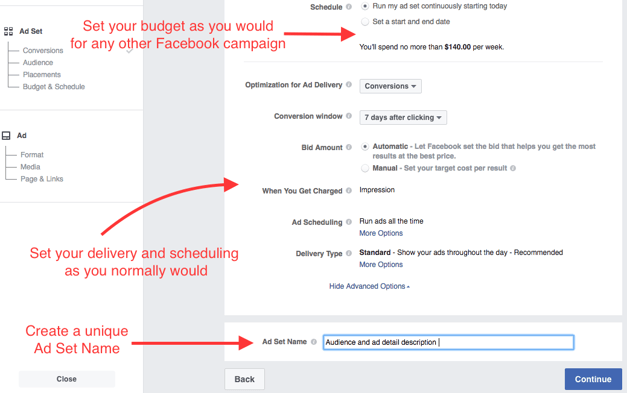
4. Now you’ll see the Ad Set screen. This is where you’ll set up conversion tracking (with your website) if applicable, create or choose an audience, choose placements (mobile, Instagram, etc.) and set budgeting and scheduling. Since this guide is focused on creating a Carousel ad, we won’t go into the details of creating your Ad Set.
But, as mentioned above, once you’ve chosen your settings, you will name the Ad Set – use something that will help you distinguish this Ad Set from others within this particular campaign.
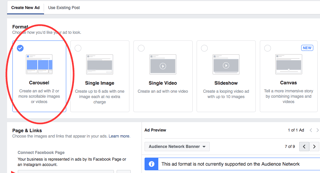
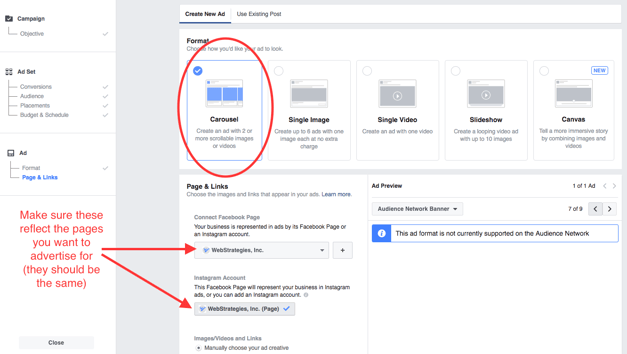
5. Next, choose the format for your ad. In this case, you’ll choose “Carousel”. Also, make sure you’ve selected the correct account in the “Connect Facebook Page” drop-down within the “Page & Links” section.
6. Scroll down to the "Text" section - here, you can add text above your graphic. This will show up the same as if you were posting an image on your own personal Facebook page.
I oftentimes leave this area blank and let people focus instead on the image and headline copy. But, it can be a great spot to add copy that will speak directly to your target audience. If you aren't able to explain your product or service fully in the headline and description spaces below, you can add a little text here to support that copy. Just be careful not to overdo it.

7. Now for the fun stuff!
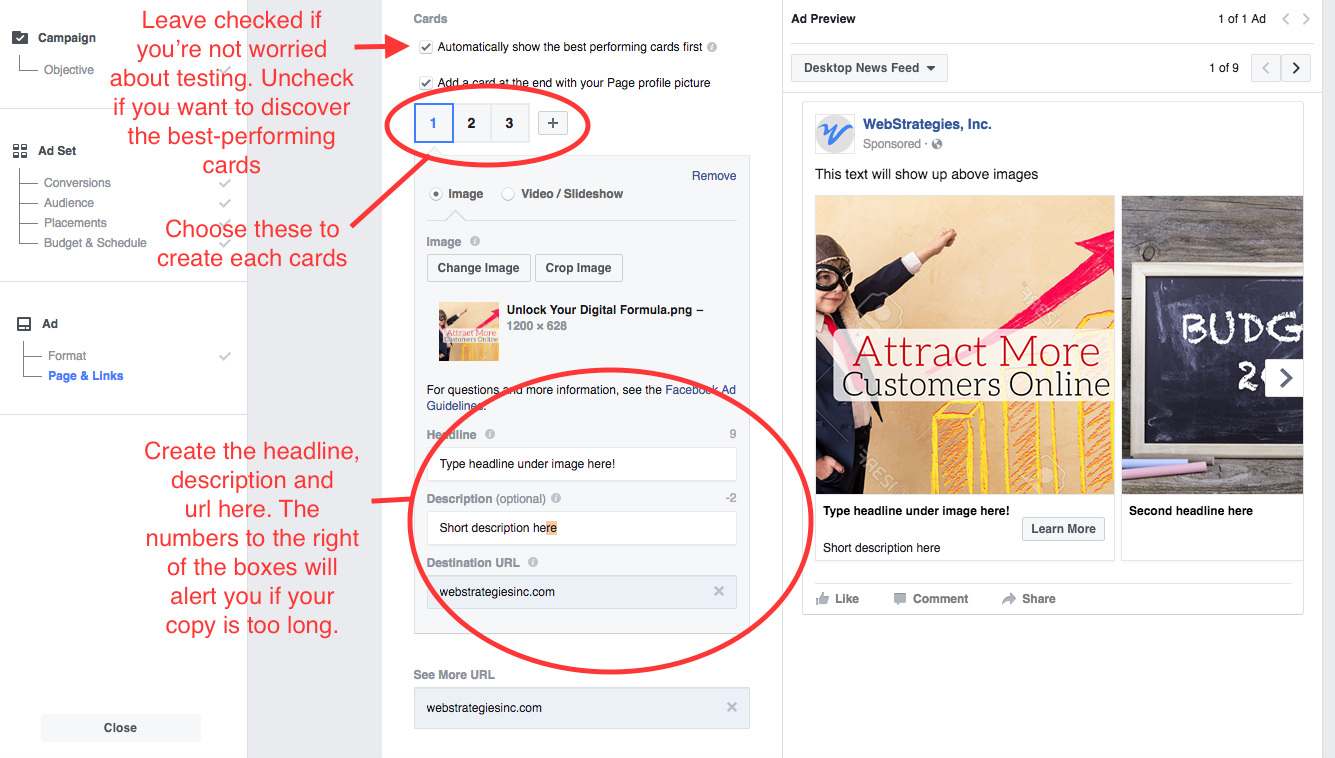
When you scroll down, you find the "Cards" section (meaning, the different ad "cards" that make up your carousel). The default number of cards is three, but you can add more if desired. I recommend sticking with three, at least to start.
If you want to truly test the performance of your cards, un-check the "Automatically show the best performing cards first" box. And to really get accurate test results, you should copy the ad and mix up the card order so that each card shows in the first, second and third spot once. Otherwise, the cards in the first two spots will have a better chance of performing well.
If you'd rather set it and forget it, leave the "Automatically show the best performing cards first " box checked.
Next, select the card you want to create - either 1, 2 or 3. Insert your image and edit the image if needed. You can use the preview to the right to see if your image is displaying as desired.
Below that, add your headline and a succinct description. These should be attention grabbing, actionable and relevant to the card that your working on. The copy you use should also be consistent with the messaging on the page you're sending people to. And, unless you're just testing images, be sure that each card is distinct.
If you're leading people to different pages on each card then each card should include a different destination url. To help keep track of the results, use a tool like Google's URL Builder to create a unique url that you can track in your analytics. This will allow you to clearly track performance of each card.
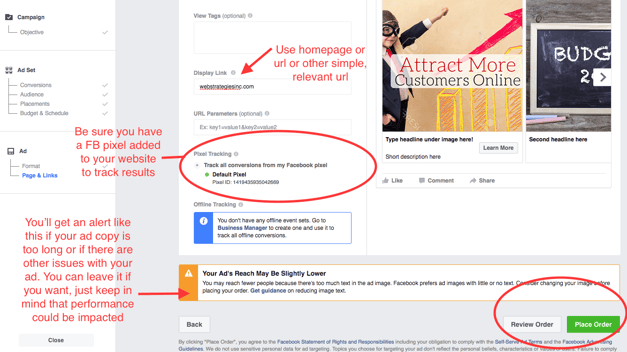
8. Proceed to add a display link for your ad. This link just helps identify your company or organization - you want to keep this short. Most of the time, it's best to use your homepage url, but you can also use another, relevant url (eg shop.url.com).
Here, you'll also see a message about your Facebook Pixel. This should match the marketing objective you chose in the beginning. If you don't have a pixel and you want to track conversions easily, you can add it. If it's already added to your site, just double check that it matches your desired marketing objective.
You may also get an alert at the bottom of this page (see below). This is usually for something like ad copy or image issues. Some issues you are required to resolve, while others (like the one below) are optional. According to Facebook, too much text can have an impact on the number of people that see your ad. So, just keep that in mind when deciding whether or not to move forward.
Once everything looks good, click "Place Order" at the bottom right. You can review your ad details first by selecting the "Review Order" button.
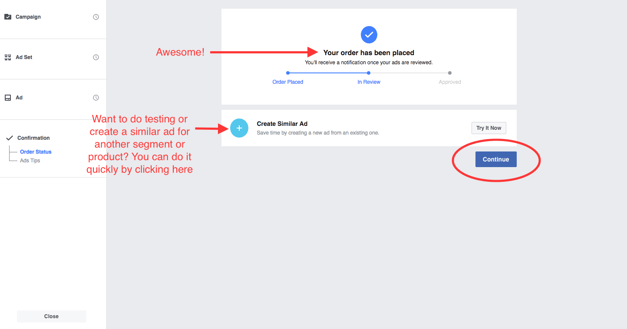
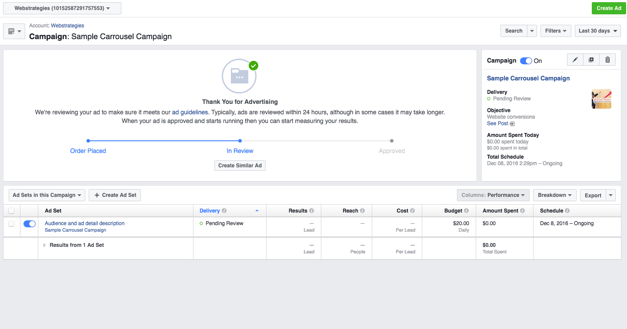
9. Clicking "Place Order" will take you to the next page. Here, it confirms that your order was placed and shows that your ad is being reviewed. Typically, the review stage only lasts a few hours at most.
If you want to test a similar carousel ad or create a similar carousel ad for a different segment or product, you can choose the "Create Similar Ad" option. You can also do this later. If everything looks good, simply click "Continue".
10. Once you click continue, you're all done... Congrats – you've set up a Facebook Carousel Ad! Now you'll see a page that lists your new ad (which will be pending review). Here, you can make changes to your ads, pause them, check results and compare performance.
Check on your ad routinely to be sure it's performing as desired. If it's not, try making small changes to your audience, budget, ad copy/images, etc. to see how you can get the ads to convert better. When making changes, think about who your target audience is and how you can better reach and engage them.
Did you enjoy this post? Drop a line below in the comments section to let me know what you think!
Also, check out these related blog posts:
- Should I Use Facebook Or Google Advertising?
- Relevance Versus Intent: How Facebook Is Flipping The Advertising Game
- Intro to Facebook Advertising


Agree, disagree, or just have something to add?
Leave a comment below.